
|
| 1. Running the Default Model |
Goal: Run the model with default parameters and emission settings.
What you do: What will happen: Click the link found in the WWW ISAM Toolbar at left.
This will run the ISAM model with default parameters, emissions and simulation period. A red page will appear that verifies the model is currently processing. When the model is finished, you will see a web page informing you of just that. You have just succesfully run the model!
|
| 2. Viewing Model Results |
Goal: View a graph and table of CH4 emissions data from the model run.
What you do: What will happen: On the toolbar, click the link to open the results category and select the
link.
This will open a menu referencing all the items available for graphing. Select the model run from the first menu (even if there is only one model run, it must still be selected!). Select 'CO Emissions and Concentrations' from the bottom menu and click the 'Get Results' button below that menu. Then choose the CH4 Emissions button. You should get a graph like the one below left. When finished viewing different graphs, return to menu and click the link found in the toolbar under the View Results category (if you can not see these, click the
This will open a menu referencing all the available result tables. Again, select the model run from the first menu, then select CO Emissions and Concentrations, like in the graphs. Click the 'Get Results' button. You will see a table like the one below right. 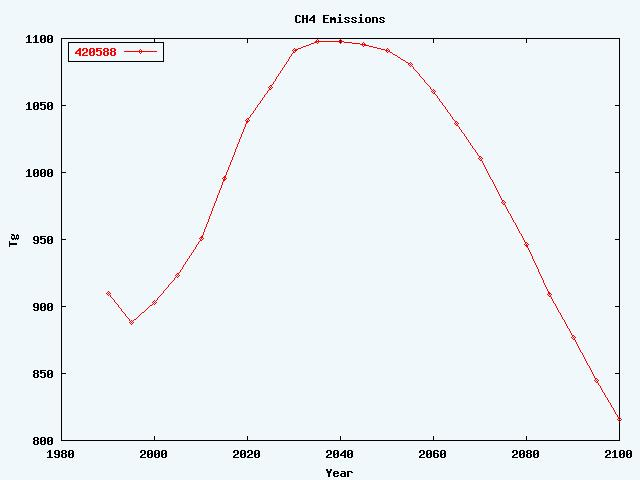
Click image to enlarge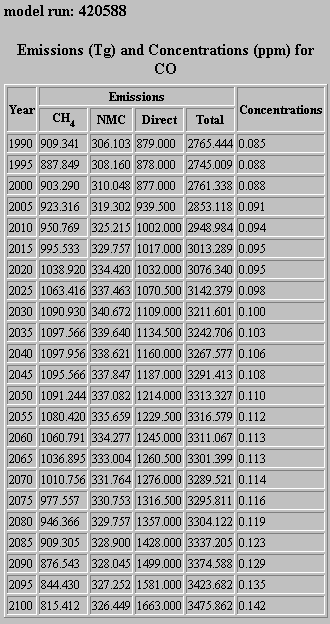
Click image to enlarge
|
| 3. Changing a Model Parameter |
Goal: Change the Carbon Cycle parameter of Mixed Layer Depth to 150m.
What you do: What will happen: Click on the link and then click the
link from the toolbar.
This will open a series of input boxes relating to these model parameters and a few key links in the main page. In the box next to Mixed Layer, type 150 and press the 'Set Carbon Cycle Parameters' button. The new data is saved and you are transferred back to the main page. Note: Whenever you return to re-edit the parameters, the values you just provided will show up in the input boxes This is true for all settings made in model period, parameters, and emmisions scenario. ( even after you have run the model ). If you wish to restore the default values, click the 'Restore Default Settings' button.
|
| 4. Changing Model Emissions |
Goal: Change the CO2/CH4/N2O/CO/SOx emissions to reflect the IS92a scenraio.
What you do: What will happen: Click the link and click the
link from the toolbar.
This will open a table of related input boxes and buttons on the main page. Click the 'is92a' button to change the emissions to reflect the IS92a scenario and then press the 'Set Greenhouse Gas Emmisions' button to save the changes. The information is again saved and you will again be returned to the main page. Note: You can also change the settings by entering new values into the boxes.
|
| 5. Changing Simulation Period |
Goal: Set the model to run until 2200.
What you do: What will happen: Click the link and then click the
link and then choose 2200 from the menu and press the 'Set Model and Period' button.
The new information is saved and you will again be returned to the main page.
|
| 6. Running the Model Again |
Goal: Run the model with the new settings.
What you do: What will happen: Run the model again with your new input by again clicking the This will run the ISAM model with updated parameters, emissions and simulation period. Note: To view results from this run, make sure you select the correct run number in the top menu of the view graphs or view tables pages. Newer runs have higher run numbers, but you should make notes about what changes were made to which model run.